The Right Tools for Southern Soil
Professional farmers, food plot managers, turf and groundskeepers, and landowners know that success in the field comes down to using the right tools for the job. In the Southeastern U.S. (from Alabama’s pastures to North Carolina’s turf), land managers value American-made, durable, and efficient equipment to improve row crop production, pasture management, hunting land food plots, and golf course turf.
This comprehensive guide explores how aeration, seeding, and fertilization equipment – the cornerstone tools provided by top agricultural equipment manufacturers – can dramatically improve soil health and crop performance. We’ll dive into each category of equipment, highlight specific solutions (like the 1st Products AERA-vator, AGRI-vator, and Plot Planter), and provide real-world examples backed by research. By the end, you’ll understand how to choose and use these tools effectively to maximize yields and maintain healthy land. Let’s get started!
Soil Aeration Equipment: Enhancing Soil Health and Root Growth
Healthy soil is the foundation of any productive farm, pasture, or turf. Over time, however, soils often become compacted from heavy machinery or livestock traffic, especially in the clay-rich soils common in parts of the Southeast. Aeration equipment is designed to alleviate this compaction by opening up the soil, allowing air, water, and nutrients to penetrate deeper into the root zone. This section covers why aeration matters, the types of aeration tools available, and how innovative solutions like the AERA-vator are used in real-world applications.
Why Aeration Matters for Soil Health
Soil compaction compresses pore space in the soil, making it difficult for plant roots to grow and for water to infiltrate. By aerating – i.e., poking holes or creating fractures in the soil – you relieve this compaction and greatly improve the growing environment for plants. According to the U.S. Golf Association, aeration is performed primarily “to relieve soil compaction, stimulate root growth and improve drainage”. The pores and holes left by aerators also facilitate gas exchange, preventing oxygen starvation of roots and allowing excess moisture to evaporate. In practical terms, a well-aerated soil absorbs rainfall more readily (reducing runoff and erosion) and fosters deeper, stronger roots that can access nutrients and water reserves.
For turf managers, the benefits are clear: regular aeration leads to healthier, more resilient grass that can withstand heavy foot traffic on sports fields or golf courses. Likewise, farmers and ranchers see aeration as a way to rejuvenate pastures. By breaking up the surface crust or compaction from cattle hooves, an aerator “should allow more water infiltration and improve forage growth” if shallow compaction is limiting yields. Aeration can also help reduce heavy thatch layers on grass by punching through the organic mat and integrating it with soil. In short, aeration equipment is a key tool for pasture management and turf care to maintain long-term productivity of the land.
However, it’s important to note that the effectiveness of aeration can vary with soil conditions. Research has shown mixed results: in some trials on pastureland, using aerators or subsoilers on compacted clay soils doubled forage yields, while other studies on looser sandy soils found little to no yield difference between aerated and non-aerated areas. The consensus among agronomists is that aeration pays off the most in situations of severe surface compaction or poor infiltration. If your soil is already friable or your pasture isn’t truly compacted, aerating might not show dramatic benefits. In the Southeast, for example, a Florida study on sandy bahiagrass pastures found no yield increase from aeration and even a yield decline in an older pasture, concluding that aeration had no benefit on those well-drained sands. Meanwhile, on heavier clay or silt loam soils with a hard crust, aeration has been observed to significantly increase grass growth in some cases.
The takeaway: understand your soil type and compaction level. Use a soil probe or penetrometer to gauge compaction; if there’s a hardpan or tight surface layer, that’s when aeration equipment can truly shine by restoring permeability and root access to nutrients.
Types of Aeration Equipment and How They Work
Not all aerators are the same – there are several types of implements that achieve soil aeration in different ways, each suited to particular conditions:
- Core Aerators (Plug Aerators): These use hollow tines to remove small plugs of soil (e.g. half-inch diameter cores) from the ground. Core aeration physically extracts soil, creating open holes that improve air/water flow and help reduce thatch. It’s a common practice on golf course greens and lawns. The removed plugs eventually disintegrate, redistributing soil and organic matter. Core aeration is somewhat disruptive (leaving cores on the surface), but is highly effective for thatch-heavy turf.
- Spike or Blade Aerators: These implements use solid spikes, discs, or blades to punch narrow holes or slits in the soil without removing material. Examples include spiked rollers and coulter-type aerators. They create openings for water and roots but do not remove soil cores. Spike aeration is less disruptive to the turf’s surface (no messy plugs), but the holes may close up faster than with core aeration. It’s often used when minimal surface disturbance is desired, though its impact on compaction is typically shallower.
- Slicer or Slit Aerators: Similar to spike aerators, these have rotating knives or tines that slice into the soil and turf, cutting through thatch. They are often used during peak growing season as a gentle way to aerate and prune roots (promoting branching). Slicing creates narrow slits that allow some air exchange and help with surface drainage. Turf managers use slicing aeration as a “non-disruptive practice… in peak growing season” to alleviate stress without taking fields out of play.
- Vibratory or Oscillating Aerators: A more specialized category, these machines use vibration to fracture the soil. The 1st Products AERA-vator is a prime example – it has sets of tines that vibrate rapidly as they penetrate, shattering the soil underground without turning it over. This creates a network of cracks and holes that relieve compaction and open up the root zone, all with minimal disturbance to the surface turf. On a golf fairway or athletic field, a AERA-vator can loosen the soil under the grass while leaving the sod intact (no cores to clean up). This technology was even shown to reduce compaction on artificial playing surfaces by 25% after one pass, by simply vibrating and loosening the fill materials. Vibrating aerators are extremely useful for sod farms and sports turf where maintaining a smooth surface is crucial.
- Subsoilers (Deep Aerators): Though not typically thought of as “aerators” in the turf sense, subsoiler implements perform deep vertical tillage, breaking up hardpans well below the surface (12–18 inches deep or more). These are heavy shanks that rip through the subsoil. While generally used in row crop production for alleviating plow pan compaction, some pasture renovators have slender shanks that act like subsoil aerators. They can greatly improve rooting depth and drainage on severely compacted fields – for instance, a Texas study found that deep chiseling a dense clay soil doubled forage yield by allowing roots to penetrate a formerly impermeable layer. Subsoiling is more invasive and requires significant tractor power, so it’s done infrequently (perhaps every few years) when needed.
In practice, aeration equipment selection depends on the situation. Golf courses often use core aerators annually on greens (followed by sand topdressing to fill the holes) to keep the turf firm and healthy. Landscapers and sports turf managers might alternate between core aeration and slicing or spiking throughout the year to balance aggressive compaction relief with low-disruption maintenance. Farmers looking at pasture management may try spiked pasture aerators or subsoilers to renovate tired fields. It’s wise to evaluate how compacted your soil is and choose the least disruptive tool that can get the job done.
One unique solution for pasture and turf is the 1st Products AGRI-vator, which is a vibrating aerator similar to the AERA-vator but available in wider widths (6, 8, or 12 feet) for larger acreage. The AGRI-vator’s vibrating tines fracture the soil and relieve compaction while hardly disturbing surface residue or sod. This makes it invaluable for sod farms – it can aerate fields that have netted turf without ripping up the netting or existing grass. In fact, sod growers have reported that using the AGRI-vator after each sod harvest speeds up regrowth of the grass by improving rootzone conditions. For example, one Southeastern sod farm noted that after running an AGRI-vator on their Bermuda grass fields, the sod re-established much faster, directly leading to shorter harvest cycles and higher annual production (more turns per year). That faster regrowth – claimed to be up to 30% faster – means more profit for sod producers and is a testament to how effective modern aeration equipment can be in the right scenario.
Real-World Applications of Aeration (Pastures, Turf, and More)
To illustrate how aeration equipment is used, let’s look at a few real-world examples and best practices:
- Rejuvenating Compacted Pastures: Consider a cattle pasture in Alabama that has developed hard, compacted spots around feeding areas and gates. Running a pasture aerator or vibratory AGRI-vator in those high-traffic zones can break up the compaction, allowing rainwater to soak in rather than puddle. While studies show that blanket-aerating an entire pasture may not always boost forage yield unless compaction is truly an issue, strategically aerating trouble spots can improve grass growth and reduce runoff. Some farmers also combine aeration with overseeding: immediately after aerating, they spread clover or ryegrass seed so that the seed falls into the holes/slits. The loose soil and improved moisture absorption help those new seeds germinate. (We’ll cover seeding equipment shortly – but note that some aerators can be fitted with seeders to do this in one pass!)
- Sod Farms and Turfgrass Production: Sod producers in the Southeast frequently use machines like the AGRI-vator to keep their fields in top shape. After each sod harvest (which leaves the field nearly bare with some remnant grass and roots), the soil can become compacted and covered with a layer of fine sediment. One golf course in Arizona faced a flood that deposited silt on their fairways – the superintendent credited the AGRI-vator with “breaking up the silt layer and opening up the soil” so that water could percolate again. On sod farms, using a vibratory aerator helps loosen the soil for quicker grass re-establishment. It also presses down any uneven ribbons of soil left from harvesting, flattening the field. Aerating after fertilization is another trick: a sod farmer from Georgia found that running the AGRI-vator right after spreading fertilizer helped “lock” the nutrients into the soil rather than leaving fertilizer granules on the surface. This improved the uptake of fertilizer and overall growth of the sod. In effect, aeration combined with fertilization gave a one-two punch: the aerator created openings for nutrients to go directly to the root zone, increasing fertilizer efficiency (a concept we’ll revisit in the fertilization section).
- Golf Course Greens and Fairways: Golf course superintendents plan aeration carefully to balance turf health with playability. Greens might be core-aerated 2–3 times a year (often in spring and late summer) when grass is growing vigorously so they can heal quickly. Fairways and tee boxes may get aerated with larger tines or even high-speed slicing equipment. AERA-vator units have become popular for fairway aeration because they can cover large areas fast and without disrupting play for long. Some courses perform “venting” – using very small solid tines just to poke tiny holes during the season, which relieves some stress with virtually no impact on the golfers. The frequency of aeration depends on soil conditions: sandy soils drain well and might only need annual aeration to manage thatch, whereas heavier soils could need more frequent attention to prevent compaction. The rule of thumb is to aerate before you see severe symptoms (like water pooling or grass thinning) – preventative maintenance keeps turf healthier year-round.
- Row Crop Production Tillage: In row crop farming (corn, cotton, soybeans, etc.), traditional plowing and tillage often manage compaction, but some farmers are adopting targeted aeration techniques. For instance, in no-till systems, if a localized compaction layer (plow pan) forms, a farmer might use a subsoil ripper to break it up every few years. There are also PTO-driven aerators that can be used in orchards or vineyards to loosen soil between tree rows without damaging roots. While row crop producers don’t use “aerators” in the same sense as turf managers, the underlying goal is similar: keeping the soil loose enough for roots to explore and for rain to infiltrate. Innovations in vertical tillage tools blur the line – they lightly till the top few inches (some with vibrating blades) to manage residue and compaction, functioning much like giant aerators for fields.
As you can see, aeration equipment plays a versatile role across agriculture – from keeping high-value turf surfaces playable, to extending the life of pastures and enhancing yields where compaction is holding things back. When evaluating aeration tools, consider durability (those tines take a beating in the soil) and efficiency. 1st Products’ AERA-vator and AGRI-vator units are built with heavy-duty tines and oscillating heads to endure tough soils season after season (many users report hundreds of acres covered before needing to replace tines). Maintenance is straightforward – keeping tines sharp/unbent and ensuring drive mechanisms are greased will prolong their life. Because these implements represent a significant investment, their American-made durability is crucial: robust construction means less downtime and repair. In general, “high-quality farm tools built to withstand daily use reduce the frequency of repairs and replacements”, minimizing downtime on the farm. Lower maintenance needs also translate to long-term savings, making durable aeration equipment a smart choice for any operation that values reliability.
A tractor-mounted AERA-vator with an attached seed box (the “Seeda-vator” configuration) aerating and seeding a turf area in one pass. Implements like this use vibrating tines to relieve compaction and a drop-seeder attachment to plant seed simultaneously, combining tasks efficiently.
Seeding Equipment: Efficient Planting for Pastures, Plots, and Row Crops
Sowing seeds is one of the most fundamental tasks in agriculture, but doing it effectively and efficiently requires the right equipment. From planting large-acreage row crops to seeding a wildlife food plot or overseeding a thinning pasture, there are specialized tools to handle each job. In this section, we’ll discuss the differences between broadcast seeding and drilling, look at equipment options for various scales (from big row-crop planters to compact plot seeders), and highlight how 1st Products’ seeding solutions like the MULTI-drill and Plot Planter can improve your planting success.
Seed Drills vs. Broadcast Spreaders: Achieving the Best Seed-to-Soil Contact
When it comes to planting seeds, seed-to-soil contact is king. No matter how great the seed variety or how fertile your soil, if the seed isn’t actually in contact with moist soil, it’s unlikely to germinate and establish well. Two common methods of seeding are broadcasting and drilling/planting in rows, and each has its place:
- Broadcast Seeding: This is the simplest method – seed is scattered across the soil surface, either by hand, a rotary/spin spreader, or a drop spreader. For small seeds (like clover, brassicas, or grasses), broadcasting can cover a large area quickly. However, the drawback is that seeds left on the surface may not be incorporated into the soil adequately. Without some follow-up action, broadcast seed can dry out, blow away, or be eaten by birds. For broadcast seeding to be effective, you usually need to lightly incorporate the seed and press the soil afterward. Practically, that means after spreading seed on a plot or field, a farmer might drag a harrow, chain-link fence, or use a cultipacker/roller to mix seed into the top 1/4 inch of soil and then firm it down. Penn State Extension notes that simply broadcasting seed is “less effective unless you can drag or harrow the seedbed afterward to pull some soil over the seed, then roll it to pack the soil”. The goal is to achieve that shallow planting depth (about 1/8–1/4 inch for many pasture and turf seeds) and good soil contact around the seed. Broadcasting is common for cover crops, overseeding existing turf, or situations where using a drill is impractical (e.g., very rocky ground or steep terrain). It’s also widely used for wildlife food plots when equipment is limited – many hunters will disc up a plot, broadcast their seeds, and then run a cultipacker to embed the seeds. Results can be very good if timed with rain and done carefully, but there’s more room for error compared to drilling.
- Seed Drilling/Planter Machines: Using a planter or seed drill places the seed into the soil at a controlled depth and spacing in a single pass. A seed drill typically cuts a narrow furrow (with a disc or coulter), drops the seed in, and then covers it by pressing the soil (often with a trailing press wheel). This achieves uniform planting depth and excellent seed-to-soil contact consistently. As one extension specialist succinctly puts it, “a no-till drill cuts a small slit in the soil, drops seed in, and then a press wheel closes the slit, all in one pass”. The seed is in that ideal top quarter-inch of soil, where it can quickly imbibe moisture to germinate. Drills shine when you have a large area to seed or when seeding into existing sod (overseeding) because they can ensure the seed gets past any surface debris or thatch. They are also crucial for no-till planting, where you don’t disturb the whole soil surface – instead, the drill just opens slots for seeds, leaving the rest of the soil (and its protective residue cover) intact.
There are also row crop planters, which are a type of precision drill for larger seeds like corn, soybeans, peanuts, etc. Row planters typically space seeds out at specific intervals within the row and cover them. While planters differ from grain drills (they singulate larger seeds and often have depth gauge wheels for precise depth control), the fundamental principle is the same: place seed firmly in the soil at the right depth. For instance, a corn planter might drop a kernel 1.5 inches deep in a furrow and cover it – something you’d never do with small seeds, but corn needs that depth. Grain drills are used for smaller seeds like wheat, oats, rye, and many forage seeds, usually planting in narrow rows (6–8 inches apart or so). Modern no-till drills have serrated coulters up front to slice through crop residue and a heavy frame to ensure penetration into untilled ground.
So, which method is “better”? It depends on the situation and resources, but generally:
- Use a seed drill or planter whenever you can, especially for moderate to large acreages, or if seed is expensive/limited. Drilling maximizes germination rates because most of your seed ends up at proper depth with soil contact. Drills also shine in existing pastures – they can cut through established grass to interplant new species (e.g., drilling clover into a bermudagrass sod).
- Broadcasting can work well for small plots or quick cover, especially if followed by some light tillage or rolling. It’s also useful for mixed seed sizes or where a drill isn’t available. Many wildlife managers broadcast cool-season mixtures (grains and clovers) for deer plots and achieve good stands by timing planting before a rain and using a cultipacker. For very tiny seeds (like some wildflowers or bentgrass), broadcasting might be preferred to avoid burying them too deep – often those are just pressed into the surface.
To put the comparison in perspective: broadcasting seed on an untilled pasture and doing nothing else will likely result in poor germination – seeds might be 0% to 30% effective. If you broadcast and cultipack, you greatly increase that percentage. But a drill will probably get 80%+ of the seeds in a favorable environment. In one extension guideline, they emphasize that “the key to a successful seeding is seed-to-soil contact,” and that seeds should be no deeper than 1/4 inch. A good drill inherently meets that criterion by design. So, while broadcasting is simpler, drilling is more precise and reliable. Time and labor might be the trade-off: broadcasting with an ATV spreader is quick for 5 acres; drilling 5 acres takes more time and equipment, but often rewards you with a better stand.
An example of a no-till seed drill in action, planting into an existing pasture. No-till drills like this one cut slots through the sod, place seeds at the correct depth, and press the soil closed over them in one pass. This ensures excellent seed-to-soil contact and uniform germination, which is often superior to simple broadcast seeding.
Equipment Options for Every Need: From Plot Planters to Multi-Drills
Seeding equipment comes in various sizes and configurations to match the scale of your operation:
- Row Crop Planters: These are typically multi-row machines (4, 6, 8 rows or more) pulled by tractors, used for crops like corn, soybeans, cotton, and peanuts. They usually have individual row units with seed hoppers, double-disc openers, depth gauges, and closing wheels. While 1st Products focuses more on tillage and seeding for turf/pasture, it’s worth noting that row crop production relies on planters for precision. If you’re a farmer in the Southeast planting corn, you likely use a planter that also can place starter fertilizer in the row (we’ll talk about fertilization soon).
- Planters ensure each seed is placed at a set interval (like one corn seed every 6 inches in the row) which a grain drill does not do – drills spill out a mostly continuous flow of seed. The efficiency of modern planters is incredible: using GPS and variable-rate technology, they can adjust seeding rates on the go, avoid overlaps, and even plant different hybrids on different parts of a field. For the purpose of this guide, just remember that large-scale row crops have specialized planters, but smaller-scale seeding can be tackled with drills or combo tools.
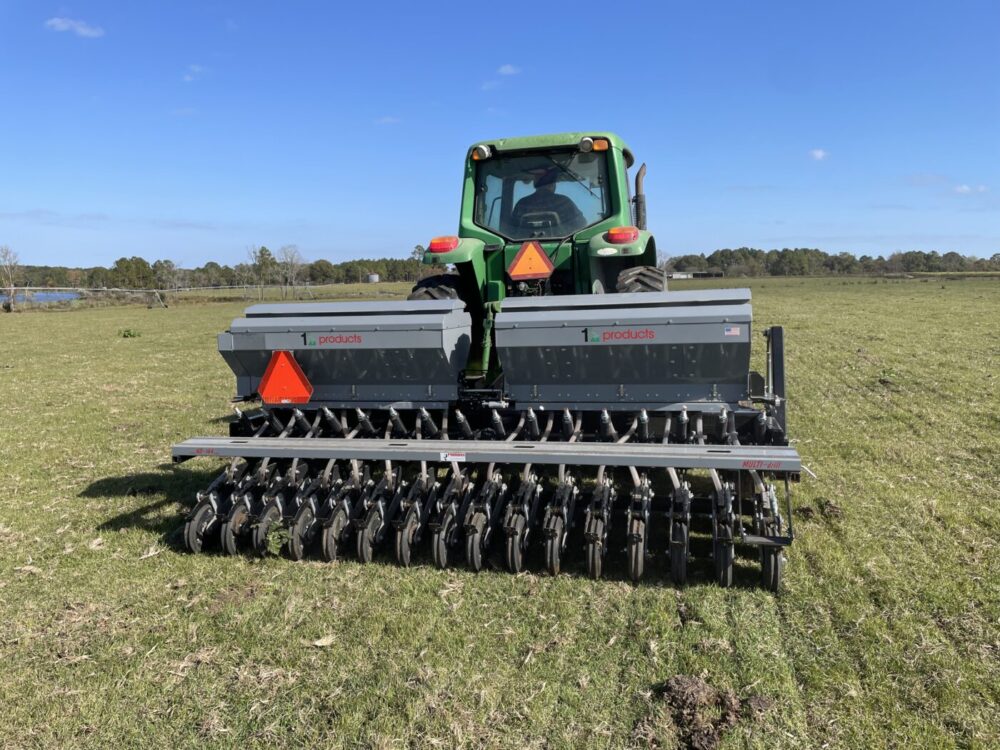
- Grain Drills and No-Till Drills: These are often measured by width (5 ft, 7 ft, 10 ft, etc.) and by the number of disc openers. For example, 1st Products offers the MULTI-drill in a 10-foot width (with 14 openers on 9-inch spacing) and a smaller 5-foot model. The MULTI-drill is built to handle both conventional and no-till seeding, meaning you can use it on a prepared seedbed or directly into residue. It comes with features like adjustable seed metering, the ability to plant different seed sizes (some have multiple seed boxes for different seed types), and robust construction to penetrate firm no-till ground. If you manage a pasture or wildlife food plot and can justify the investment, a no-till drill is a game-changer.
- For instance, rather than discing and destroying the existing grass (and risking erosion), you can directly drill in a winter annual like ryegrass into a bermudagrass pasture at the end of summer. The drill will slice in the seed, and by fall you have a mixed stand without ever leaving the soil bare. Many county conservation districts or extension offices in the Southeast actually have no-till drills available for farmers to rent, recognizing how beneficial they are for pasture improvement. Owning your own drill (like the MULTI-drill) makes sense if you have substantial acreage to seed each year or multiple food plots to maintain.
- Compact Plot Planters/Seeders: For landowners and hunters planting smaller food plots (say 1/4 acre to 5 acres), there are scaled-down implements often called plot planters. These may combine multiple functions – some models on the market (like the Ranew’s Plotmaster or Woods FPS series) integrate a disc harrow, seeder, and cultipacker in one unit. They allow a single pass to disc the soil, drop the seed, and then pack it. 1st Products’ approach to this need is to provide high-quality small drills (like a 5-ft no-till drill) or attachments that can turn existing equipment into seeders. For example, their AERA-vator can be fitted with a seed box (sometimes branded as SEEDA-vator when attached) to essentially act as an overseeder. This combination is perfect for food plots: you can aerate the plot (breaking up soil and preparing a seedbed) and simultaneously seed clovers, brassicas, or grains. In one pass you’ve done what normally would take multiple implements.
- The Plot Planter, mentioned in 1st Products’ lineup, refers to equipment tailored for wildlife plots and small farms – heavy-duty enough to last, but sized for utility tractors or even ATVs in some cases. These might include drop spreaders with metering for seeds and the ability to lightly till the soil. Always consider the tractor horsepower and hitch requirements when selecting a planter or drill for plots: many small no-till drills (5–6 foot) can be pulled by a ~40 HP tractor and are 3-point hitch mounted, whereas larger ones might need 80+ HP or even be tow-behind units.
- Overseeder Attachments: Besides dedicated drills, there are overseeder attachments that can be added to aerators or tillage tools. We discussed the seed box on the AGRI-vator/AERA-vator which is one example. Another common tool in turf is a slit seeder – essentially a gas-powered or PTO unit that slices the ground and drops seed in the slits. These are used to overseed lawns or athletic fields without extensive tillage. In pastures, some people try broadcasting seed then using a spiked aerator to punch it in. Results vary, but the concept is to get the best of both worlds by using an aeration tool to improve seed incorporation. The AGRI-vator with seedbox and spiker roller is effectively doing that: it spikes holes and drops seed at the same time. A farmer in a sod business might call this a one-pass overseeder for turf grass, enabling them to seed without disturbing the existing turf netting1stproducts.com. Versatile tools that combine tasks can save fuel and time – something highly valued in farming.
- Specialty Seeders: There are also specialized seeding equipment like orchard seeders (designed to plant cover crop between orchard rows), interseeders (for interplanting cover crops into standing corn, etc.), and precision vegetable seeders. For the sake of brevity, we won’t delve deeply into those, but know that if you have a niche need, chances are an equipment manufacturer has a solution. For example, if you wanted to plant wildflowers over a large area, you might use a native grass seeder that handles fluffy seeds. Or a pasture renovator might have combination units that coulter, seed, and roll in one go.
Given the audience in the Southeast, let’s touch on a couple of scenarios:
- Overseeding Warm-Season Grass Pastures: A common practice is to overseed ryegrass or small grains into dormant bermudagrass pastures for winter grazing. Using a no-till drill is ideal for this – it minimizes soil disturbance and gets the seed where it needs to be. As Kentucky experts recommend: “Use the best seeding method available – using a no-till drill is recommended for overseeding”, which aligns with on-farm success stories. Drills ensure a uniform stand, which is critical for grazing (you don’t want sparse spots). If a drill isn’t available, producers might broadcast and lightly disc or use cows to “hoof-in” the seed by feeding on the pasture (anecdotally, that sometimes works). But the reliability of a drill often justifies finding one.
- Establishing Food Plots for Wildlife: Suppose you have a hunting property in South Georgia and you want to plant 2-acre food plots with blends of oats, peas, and clover. You have a 50 HP tractor. A great setup would be a 3-point plot planter or a small no-till drill. If the plots have existing vegetation, you could mow and/or spray to kill weeds, then directly drill your mix in early fall. If you don’t have a drill, you could disk the plot, then use a cultipacker-seeder combo to broadcast and pack. Many hunters invest in a heavy-duty cultipacker because pressing the seed in is so crucial for success with broadcasting. Some modern plot planter implements have a built-in cultipacker just behind the seeder. 1st Products’ Plot Planter, for instance, emphasizes all-in-one efficiency and is built durable enough to handle rough food plot conditions (roots, rocks, etc.) that might break a lighter-duty machine. The result is improved germination and utilization of seed – important when every dollar spent on seed and lime counts.
- Reseeding Lawns or Sports Fields: Landscapers often use slit seeders or small tractor-mounted overseeders to renovate lawns. These typically cut tiny grooves and drop seed in. A machine like the WA-24 Walk-behind AERA-vator (a small walk-behind aerator by 1st Products) can be coupled with a seeder as well, ideal for patch seeding lawns or tight areas. The principle remains: open the soil and get seed in contact.
Key features to look for in seeding equipment include adjustable seed metering (so you can plant different rates and seed sizes accurately), reliable depth control, and low-maintenance design. The 1st Products MULTI-drill, for example, has variable speed electric drive options for precise seeding rates, and can handle both small legumes and larger grains by swapping seed plates. It’s also heavy enough for no-till use, which is important for penetration. When seeding very small seeds (like clover at 2-5 lbs/acre), a well-calibrated drill ensures you don’t overplant or underplant – calibration is often a simple matter of turning the drive a set number of revolutions and catching seed to weigh it, as demonstrated in guides like Noble’s “Seed Drill Calibration” video. Taking the time to calibrate avoids seed waste and patchy stands.
In summary, seeding equipment ranges from simple broadcast spreaders to complex drills, but the right choice depends on your specific needs. If you’re a professional turf manager or a farmer with significant seeding tasks, investing in a high-quality drill or combo seeder will pay dividends in better stands and time savings. And if you’re a landowner with a few food plots, there are durable American-made plot planters that can make your life easier and your plots more productive. Quality matters here too – a cheaply built seeder might jam, distribute seed unevenly, or break down frequently. It’s frustrating to have a narrow planting window (common in the South’s unpredictable fall weather) and be sidelined by equipment issues. That’s why many agricultural equipment manufacturers focus on durability and precision in their seeding implements, knowing that farmers need them to perform flawlessly when the time is right.
Fertilization Equipment: Maximizing Nutrient Efficiency and Yield
Along with planting the seed, feeding the crop with proper fertilization is the other half of the yield equation. Fertilizer (whether in the form of nitrogen, phosphorus, potassium, or lime and micronutrients) must be applied in the right amount and in the right place to be effective and cost-efficient. Fertilization equipment helps farmers and land managers distribute nutrients evenly and, in modern practices, precisely. In this section, we’ll explore different fertilization equipment including broadcast spreaders, banding applicators, and liquid systems. We’ll also discuss how equipment design (and application method) can save money by increasing fertilizer uptake – a topic of huge importance with today’s fertilizer prices.
Broadcast vs. Banded Application: Placement Makes a Difference
Traditionally, many farmers broadcast fertilizer uniformly across the field. This is typically done with spinner spreaders (for dry granular fertilizer) or spray booms (for liquid fertilizer). Broadcasting is simple and fast; for example, a co-op truck might fling dry fertilizer pellets in a 60-foot swath, covering acres in minutes. However, broadcasting isn’t always the most efficient way to deliver nutrients to plants. A significant portion of surface-applied fertilizer can get tied up in the soil or lost before plants can use it – especially true for phosphorus (P) and potassium (K) fertilizers on certain soil types. That’s where banding comes in.
Banded fertilizer application means placing fertilizer in concentrated bands, usually either in the soil or at least in a confined zone, rather than spreading it everywhere. One common banding method is called “starter fertilizer” in row crops, where a band of fertilizer is placed 2 inches to the side and 2 inches below the seed at planting. Another banding method is side-dressing, where fertilizer (often nitrogen) is knifed into the soil alongside growing plants. The idea is to put nutrients closer to the root zone and reduce contact with a large volume of soil. Why is that beneficial? Because soils, especially in the Southeast, can fix or lock away nutrients like P and K when they are spread out. For instance, in very acidic soils (common in the South unless lime is applied), phosphorus quickly reacts with iron and aluminum to form insoluble compounds. By banding P fertilizer, you limit its exposure to the bulk soil, so less of it gets tied up and more remains available for the crop. The University of Minnesota Extension explains that “banded application minimizes contact between soil and fertilizer, reducing fixation or tie-up of phosphorus and potassium”. Essentially, banding makes more efficient use of each pound of fertilizer.
The efficiency gains of banding are not just theoretical. Field research demonstrates real benefits: In one Florida study, banding phosphate (P₂O₅) and potash (K₂O) fertilizer allowed a one-third reduction in fertilizer amount while still boosting yields by 7–10% compared to broadcasting full rates. In other words, farmers got more crop with less fertilizer by banding – a huge cost savings and environmental win. Similarly, long-term Midwest trials have shown that banding fertilizer can maintain yields even at 75% or 50% of the normal broadcast rate. For example, an Illinois study found that deep-banded fertilizer yielded +6 bushels/acre more corn than broadcast, even when using only half the fertilizer rate. These results underscore how precise placement can cut input costs. In practical terms, a farmer might normally broadcast 300 lbs of fertilizer per acre, but by banding they might only need 200 lbs to achieve the same or better crop results. That can “reduce fertilizer cost by at least a third” right off the bat.
Given these advantages, fertilizer applicator equipment has evolved to facilitate banding. Let’s go through the main types of fertilization equipment and their uses:
Dry Fertilizer Applicators (Broadcast and Banded)
Dry granular fertilizers (like urea, NPK blends, lime, pelletized lime, etc.) can be applied with either broadcast spreaders or specialized band applicators:
- Broadcast Spreaders: These include PTO-driven pendulum or twin-disc spreaders that mount on tractors, as well as larger pull-type or truck-mounted spinner spreaders. They fling fertilizer granules in a wide pattern. Broadcast spreaders are ideal for quickly covering large areas, e.g., top-dressing a pasture with ammonium nitrate or spreading lime on a field. The limitation is, as discussed, nutrients end up on the surface and spread out. For pastures and hayfields, broadcasting is common and often appropriate (you can’t easily band fertilizer in an established sod without specialized gear). For row crops, broadcasting is often done before planting (then incorporated by tillage) or as a topdress on small grains.
- Banding Applicators (Dry Fertilizer): These are devices that place dry fertilizer in specific locations. A classic example is the fertilizer hopper attachments on planters or cultivators that apply fertilizer in bands along the row. 1st Products manufactures dry fertilizer applicators that allow growers to band fertilizer in the row during planting or side-dress later. For instance, their 250–500 lb Fertilizer Hopper can mount on a toolbar and dispense fertilizer through 2 or 3 outlets, dropping granular fertilizer precisely where needed. Farmers can adjust the rate (pounds per acre) and target the row spacing they want. By banding fertilizer this way, 1st Products notes you can reduce fertilizer costs by up to 1/3 because you’re not wasting fertilizer on areas where crops won’t use it (like between rows). These applicators typically use coulters or knives to cut a slit and funnel the fertilizer into the soil (or they drop it on the surface in a narrow band that will later be covered by soil or rain). Some banding setups are called side-dress rigs – often 3-point toolbar frames with coulters and dry fertilizer boxes that let you fertilize row crops when they are, say, a foot tall, by slicing in additional N or K between the rows.
An example scenario: In corn production, a farmer might apply most of their phosphorus and potassium as a band at planting using a dry fertilizer hopper attached to the planter (placing it 2×2 from the seed). This could allow them to use, say, 40% less P and K than if they broadcast it, yet the corn roots get what they need because the fertilizer is concentrated near them. Later in the season, the farmer could side-dress nitrogen by pulling a toolbar with coulters and tubes that drop urea-ammonium nitrate (UAN) solution into the slit (liquid system, which we’ll get to). The net effect: significantly higher nutrient use efficiency.
For smaller applications, banding can also be done in food plots or gardens. A small grower might use a device to apply fertilizer in rows in a market garden. Even a hand-push seeder sometimes has a small fertilizer hopper to drop starter fertilizer in the row. In wildlife food plots, most folks broadcast fertilizer due to simplicity, but some advanced food plot implements can band fertilizer along with seed (particularly those that mimic row crop planters). If you have access to something like the 1st Products dry fertilizer hopper on a toolbar, you could lay down bands of fertilizer for plot rows, potentially improving uptake for row-style plots (like corn or sorghum strips for wildlife).
Liquid Fertilizer Systems
Liquid fertilizers (such as UAN 32% nitrogen solution, liquid starter blends, or even anhydrous ammonia which is technically a gas injected as liquid) require different equipment:
- Sprayer Systems: For broadcast application of liquids (like UAN dribbled on wheat, or foliar feeding), standard boom sprayers or drip bars are used. For example, a pasture might be top-dressed with UAN using streaming nozzles on a boom to minimize leaf burn. This is a broadcast method (uniform coverage). We won’t focus on sprayers here, as they are a broad category on their own.
- Liquid Banding (Starter or Side-dress Attachments): Many planters have starter fertilizer tanks and pumps that deliver a small amount of liquid fertilizer near the seed at planting. This is a form of banding – a common setup is a 2×2 placement (2 inches over, 2 inches down from the seed) using a liquid fertilizer like 10-34-0 (N-P-K) or similar. Equipment-wise, this involves tanks (on the planter or tractor), tubes, and an injection mechanism (often a nozzle or opening on the planter’s furrow opener assembly). These systems might use an electric pump or ground-driven pump to meter the liquid. The benefit is young seedlings get an immediate boost of nutrients in that band before their roots spread out.
For side-dressing liquid N in row crops, farmers might use a toolbar with coulter-injectors or hose drops. Liquid fertilizer attachments from manufacturers like 1st Products can often be fitted onto cultivators or toolbars. For instance, 1st Products offers Liquid Fertilizer Attachments presumably that allow mounting tanks and delivery systems on their toolbars. This could convert a cultivator into a side-dress applicator that knifes in liquid fertilizer between rows. The advantage of liquid is uniform application and immediate availability (e.g., UAN is readily absorbed by soil). However, it can be more expensive per unit nutrient than dry fertilizer. - Anhydrous Ammonia Injectors: In some parts of the country (less common in the Southeast), farmers inject anhydrous ammonia for nitrogen. This requires heavy-duty shanks with tubes that release ammonia ~6 inches underground, immediately covered by soil to trap it. This is a very efficient N banding method (anhydrous is the cheapest form of N typically). While Alabama or Georgia row-crop farmers more often use UAN or urea, it’s worth noting how banding via injection is standard in areas that use anhydrous. The equipment is quite specialized (knife rigs, closing disks, big nurse tanks of ammonia).
The role of fertilization equipment is to ensure nutrients are delivered evenly and at the correct rate. Whether you’re fertilizing a 200-acre cotton field or a 1-acre wildlife plot, calibration is key. A spreader needs to be calibrated so that if you intend to apply 50 pounds of N per acre, you actually do so. Over-application wastes money and can burn crops; under-application might cause yield loss. Most modern tractor-mounted spreaders and applicators have charts or rate controllers to help set the proper flow based on ground speed and desired rate. High-end models use GPS and even sectional control to avoid overlaps (preventing double-dosing areas). On smaller scales, simple gravity drop spreaders (like those used on food plots) require setting an opening and driving uniformly – often done by trial and adjusting.
1st Products Fertilizer Equipment and Efficient Nutrient Use
1st Products, being an American manufacturer focused on efficiency, offers Dry Fertilizer Applicators that align with the banding approach. Their units can be mounted on toolbars to apply fertilizer in row middles or directly with planting equipment. For example, the 2- or 3-outlet stainless steel hopper they produce can mount to a cultivator frame to side-dress corn or vegetables. It features an auger feed and adjustable rate control, allowing anywhere from about 40 lbs/acre up to over 600 lbs/acre depending on row spacing and ground drive settings. This kind of range means you could use it for light feedings or heavy applications like putting down lime or biosolids in bands. The stainless steel construction is important since fertilizer is highly corrosive – durability here means the equipment lasts many seasons. Also, a noteworthy point: banding can reduce nutrient runoff into waterways because fertilizer is placed in the soil where plants use it, rather than on the surface where a rainstorm could wash it away. This makes precision applicators an environmentally friendly choice as well.
For pasture management in the Southeast, where broadcasting is often the norm (for example, spreading potash on bermudagrass hay fields every spring), one might ask: is there a way to band fertilizer in pastures? One approach could be using a toolbar with coulters to inject fertilizer between every few grass rows – however, established sod makes it tricky. Many choose to slit-drill granular fertilizer (which is uncommon but possible with certain machinery). Given that pasture root systems eventually find broadcast nutrients, and the effort of banding in sod is high, most stick to broadcasting for permanent pastures. But on new pasture seedings or if renovating, you might band fertilizer during seeding for better efficiency. For instance, when using a no-till drill to seed, one could mix fertilizer with the seed or have a separate fertilizer box dropping into the same furrow as the seed. Some no-till drills indeed have a fertilizer box option. If you’re seeding, say, orchardgrass and clover into a prepared seedbed, you might incorporate P & K into the soil beforehand (a form of broadcast but then tilled in, which reduces tie-up by mixing it thoroughly).
In food plots, fertilizer is often one of the biggest expenses (after maybe lime). Many food plotters broadcast pelletized fertilizer (like 13-13-13 or urea) by hand or with an ATV spreader. While that works, there’s potential to waste fertilizer on areas with no plants or to lose nitrogen to the air (volatilization) if urea sits on the surface. Using a cultivator with a fertilizer attachment to band a bit of starter below where you’ll drop larger seeds (like corn or beans in a plot) can boost those plants significantly. It might not be practical for everyone, but serious managers could adopt farming techniques on their plots for improved results.
To sum up the fertilization equipment best practices:
- Consider banding fertilizer for row crops or garden rows to cut costs and potentially increase yields. Equip your planter or cultivator with a fertilizer attachment if possible. University research confirms that banding can allow using 1/3 less fertilizer with similar or better yields, as noted “fertilizer (P and K) can be reduced by at least a third when banded vs. broadcast… with a 7–10% yield increase”. That’s a huge efficiency gain.
- Use broadcast spreaders for broad-acre applications like small grains, pastures, or situations where banding isn’t feasible. Calibrate them well and apply when weather conditions favor nutrient retention (e.g., just before a moderate rain to wash fertilizer in, but not before a torrential downpour that could cause runoff).
- Maintain your equipment: Rust is the enemy of spreaders. Clean out fertilizer applicators after use and oil/grease moving parts. Many farmers in the Southeast have pulled an old buggy spreader out of the hedge only to find the bottom rusted – so investing in quality equipment (stainless steel hoppers, etc.) or properly maintaining it saves headaches.
- Think of fertilizer placement as part of your system: Combining tasks can improve efficiency. For instance, some strip-till machines will band fertilizer while creating a seedbed strip. 1st Products’ equipment lineup is geared toward these integrated approaches (e.g., you could AERA-vate and fertilize in one pass by mounting a spreader on the tractor or immediately aerating after spreading, as that sod farm did to incorporate nutrients).
By using the right fertilization equipment and method, you not only save on input costs but also promote better crop uptake of nutrients, leading to healthier plants. Given high fertilizer prices, the ability to “utilize banded dry fertilizer” and see “economic increases of $30-$50 per acre” has been observed in strip-till banding studies – essentially extra profit from equipment that places fertilizer efficiently. That illustrates how equipment choice (broadcast vs band) can directly affect your bottom line.
In the Southeast, whether you’re side-dressing cotton with a twin-row applicator or fertilizing a food plot, the principles remain: place nutrients where the plants can get them, when they need them, and avoid waste. High-quality, purpose-built fertilization equipment makes that job much easier and more precise.
Frequently Asked Questions (FAQ)
What does soil aeration do for the soil and plants?
Soil aeration perforates the soil to alleviate compaction, allowing more air, water, and nutrients to reach plant roots. This leads to stronger root development and improved plant growth. In turf, for example, aeration relieves the “suffocation” of roots and helps maintain drainage, resulting in healthier grass that can better tolerate traffic.
When is the best time to aerate and overseed a lawn or pasture?
The ideal time to aerate and seed is when your grasses are in their active growing season. For cool-season grasses (like fescue in pastures or ryegrass on lawns), early fall or early spring is best for aeration and overseeding, so they can recover and germinate in mild, moist conditions. For warm-season grasses (like bermudagrass in the South), late spring through early summer (when the grass is vigorously growing) is optimal for aeration – this ensures the turf heals quickly. Always avoid aerating during extreme heat or drought, and try to time seeding before a period of expected rainfall for best results.
Can I aerate and seed at the same time?
Yes, you can aerate and seed simultaneously if you have the right equipment. In fact, combining these tasks can be very efficient. Implements like overseeders or an aerator with a seed box (e.g., the AERA-vator equipped as a Seeda-vator) allow you to drop seed into the holes or slits created during aeration. This one-pass method improves seed-to-soil contact significantly – the aeration opens the soil and the seeder places the seed directly into those openings. The result is often better germination with less labor. If you don’t have a combo machine, you can still aerate first and then broadcast seed; just try to drag or lightly rake afterward so some seeds get into the soil.
Should I use a seed drill or a broadcast spreader to plant my seeds?
If precision and seed savings are important, a seed drill (or no-till drill) is typically the better choice. Drills ensure each seed is placed at the proper depth with good soil contact, leading to more uniform and reliable germination – this is ideal for pastures, food plots, and large lawns. Use a drill especially for larger areas or when seeding into existing sod. On the other hand, a broadcast spreader can work well for quick plantings or cover crops, especially on a prepared seedbed. Broadcasting is faster and equipment is more readily available (like a spinner on an ATV), but you should plan to incorporate the seed (via dragging, cultipacking, or light tillage) for best results. In summary, use a drill for critical or large-scale seeding, and broadcasting for convenience on smaller or less delicate projects.
What is banded fertilizer application?
Banded fertilizer application means placing fertilizer in a concentrated band or strip, usually in the soil near the crop’s root zone, rather than spreading it evenly across the entire field. For example, farmers might apply fertilizer in bands 2 inches to the side of each seed row (commonly done at planting for row crops), or inject fertilizer between crop rows. The benefit of banding is that it delivers nutrients closer to plant roots and reduces contact with soil that might tie up those nutrients. This targeted placement often increases the efficiency of fertilizer use – crops can absorb more of the fertilizer, and you can sometimes use a lower total rate compared to broadcasting. Banding is commonly used for phosphorus and potassium fertilizers and for starter fertilizers to ensure young plants have readily available nutrients.
Ready to Grow More with Less? Equip Your Land for Long-Term Success
Choosing the right aeration, seeding, and fertilization equipment doesn’t just improve your soil—it transforms your operation. In the Southeast, where compacted soils, variable rainfall, and long growing seasons can make or break a harvest, the right tool means more than efficiency—it means resilience. We’ve shown how the right aerator relieves compaction and boosts root growth, how precision seeding equipment like no-till drills and plot planters deliver denser stands, and how smart fertilizer placement reduces waste and increases ROI.
Durable, American-made equipment like 1st Products’ AERA-vator, AGRI-vator, and MULTI-drill are more than machines—they’re investments in soil health, crop performance, and time saved across every season. From golf course turf to food plots and cattle pastures, these tools are engineered to deliver results that last.
Let’s Build a Better Field—Together
If you’re looking to improve yields, reduce input costs, or just get the job done faster with less wear and tear, now’s the time to explore what 1st Products has to offer. Whether you’re managing acres of farmland or fine-tuning a sports field, our team is here to help you find the perfect match for your operation.
- Talk to our experts about your soil, crop, or turf challenges
- Get personalized equipment recommendations based on your goals
- See how our tools can save you time and money—starting this season
Ready to take the next step? Contact 1st Products today or explore our full lineup of aerators, no-till drills, and fertilizer applicators online.